This guide covers the four pillars of bake photography that any baker or brand can act on immediately: setup and equipment, lighting, styling, and composition. Whether you're shooting for social media, a website, packaging assets, or menu materials, the same core principles apply.
Key Takeaways
- Natural window light, positioned to the side of your bake, reveals texture better than any other setup
- Shoot within the first minute out of the oven — steam, glaze, and crust appearance fade fast
- Odd-numbered prop groupings and deliberate imperfections make bakes feel real and appetite-worthy
- Matching your shooting angle to the bake's strongest feature — height, crust, or cross-section — is what separates a good shot from a great one
- Visual consistency across packaging, social media, and your website builds brand recognition that no single hero shot can achieve alone
Why Bake Photography Matters More Than You Think
Food photography isn't vanity — it's strategy. Research published in Visual Design Cues Impacting Food Choice found that photographic enhancements involving hue, saturation, and brightness increased positive purchase attitudes and intentions in cited consumer studies. For bakery brands specifically, that translates directly into trial.
The visual cue of a golden crust, a gooey cookie center, or a perfect swirl of buttercream creates a craving before a consumer consciously decides anything. That instant reaction is exactly what DePersico Creative's brand philosophy, Create Cravings. Inspire Trial., is built around.
The agency has applied that thinking across decades of food and beverage work — including J. Skinner Baking, where stronger visual cohesion contributed to 210–340% sales growth.
Consistency matters as much as quality. A bakery brand's photography across its website, packaging, and social channels should feel like one cohesive visual system. Mixing phone snapshots on Instagram with polished studio shots on the website sends a mixed signal — shoppers notice the gap, even if they can't articulate why. Visual inconsistency makes a brand feel less trustworthy before a single product is tried.
Start with the Right Setup: Equipment and Prep
Gear You Actually Need
Professional equipment helps, but it isn't a prerequisite. Modern smartphones shoot excellent baked goods photos given good light and technique. Your essential checklist:
- Camera or smartphone (recent models perform well in natural light)
- Tripod — non-negotiable for repeatability and sharp shots at slower shutter speeds
- Remote trigger or self-timer to avoid camera shake
- Cleaning cloths for wiping down surfaces and props between shots
A tripod earns its place because it frees both hands, allows precise angle matching across a session, and makes slower shutter speeds viable without blur. If you're shooting in a kitchen environment, wrapping a wired remote in a small plastic bag protects it from flour and butter.
Set Up Before the Bake Comes Out
This is the single most impactful habit in bake photography: pre-focus your hero shot before the bake leaves the oven.
Baked goods peak visually almost immediately after baking. Steam fades, glaze dulls, and bread domes begin to settle within the first minute. Having your scene framed, lit, and focused before you open the oven door means you're ready to fire the moment the bake hits the surface.
Lens and Depth of Field
Canon identifies 35mm as ideal for flat-lay top-down food shots and 50mm as a strong all-purpose starting lens for food photography, a recommendation echoed by Nikon food photographer Donna Crous. On a smartphone, portrait mode achieves a similar effect — keeping the bake sharp while softening the background into a clean, non-distracting blur.
Props That Work
The best props signal "bakery" without competing with the food. Stick to:
- Wooden cutting boards and wire cooling racks
- Marble or slate surfaces
- Linen or cotton tea towels
- Vintage ceramic mixing bowls and measuring spoons
Keep the color palette warm and neutral. The bake is always the centerpiece.
Master the Light: The Single Biggest Factor in Baked Goods Photography
Natural Light vs. Everything Else
Lighting accounts for more of the final result than any other variable. Correct light makes a phone snapshot look professional; poor light ruins a beautifully styled shot. B&H Photo describes natural light as the most abundant and affordable starting source for food photography, and it remains the most forgiving option for beginners.
That said, artificial alternatives work well when set up correctly. B&H's own continuous-light food photography tutorials use LED panels positioned to the side and slightly behind the subject — mimicking window-style side lighting rather than replacing it.
Side Light Reveals Texture
Nikon food photographer Donna Crous states that food is almost always photographed with directional light from the side or back because straight-on illumination lacks depth. Side lighting rakes across the surface of a bake and picks up everything that makes it appetizing:
- The crackle and char of a sourdough crust
- Sugar crystals on a glazed donut
- The open crumb structure of a sliced loaf
- The ridges and valleys of a croissant's layers
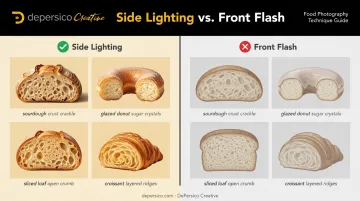
Front-on flash flattens all of these details. Avoid it.
Managing Harsh Sunlight
Shoot during early morning or on overcast days for naturally diffused light. When direct sunlight is strong, a sheer curtain or an inexpensive diffuser panel placed between the window and your subject softens it into a gentle, even glow that eliminates harsh shadows.
White Balance and Warm Tones
Once your light source is controlled, the next variable is your camera's white balance. B&H recommends setting it to a fixed Kelvin value rather than leaving it on auto: 5600K for daylight is their direct-sun benchmark. Cool, blue-tinted photos are one of the most common reasons home bakes look unappetizing on screen. Baked goods live in the golden-brown color family; a white balance that skews cool strips them of warmth and appetite appeal.
Capturing Steam and Flour in Motion
Both steam and falling flour can transform a static bake shot into something that reads as fresh and alive. Each requires its own approach:
- Steam: Use a dark background with side or backlighting so wisps register against the backdrop. Pre-focus before the bake exits the oven and shoot a burst immediately — wisps fade within seconds.
- Falling flour: Canon food photographer Linda Lomelino shoots at 1/1000 second to freeze motion, then adjusts ISO and aperture to compensate. She pairs burst mode with flour dusting and selects the sharpest frame afterward.
Styling Your Baked Goods for the Camera
Intentional Imperfection
A slightly flour-dusted surface and a few crumbs scattered near the board feel authentic and warm. An overly pristine setup reads clinical. The goal is to make the viewer feel the warmth of a real bakery — not a catalog.
Arranging Mise en Place
Raw ingredients as props add visual richness to flat-lay shots. A few principles:
- Work in odd-numbered groupings — odd numbers feel naturally scattered rather than deliberately placed when positioning ingredients like flour, berries, and garnishes around your main subject
- Use natural color and texture contrasts: white flour against dark wood, golden butter beside brown sugar
- Allow natural-looking "spills" rather than perfect arrangements
The Flour-Dusting Mistake
Sifting flour directly onto a finished bake makes it look raw and unbaked. Instead, dust a light layer of flour onto the board or surface around the bake through a fine-mesh sieve. It suggests handmade craft without obscuring the crust.
Styling by Baked Good Type
| Baked Good | Best Styling Approach |
|---|---|
| Bread / loaves | Show crust texture on the exterior; slice to reveal open crumb |
| Cookies | Stack 3–4 high; break one to show a gooey or chunky center |
| Layer cakes | Slice and shoot the cross-section so layers read instantly |
| Pies and tarts | Pull a slice to reveal the filling |
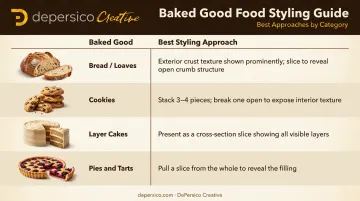
Small finishing details are often what separate a good shot from a great one.
Small Details That Signal Freshness
- A glaze drizzle mid-pour
- Powdered sugar sifted through a fine sieve just before shooting
- Turbinado sugar crystals scattered on a crust
- A fresh herb sprig beside a savory bake
Add these last — after framing and lighting are locked — so they look their best before the shutter fires.
Getting the Shot: Angles, Composition, and Key Moments
The Three Working Angles
There's no universally correct angle — the right choice depends entirely on what's most appealing about the specific bake. Professional food photographer Rachel Korinek recommends:
- Overhead (bird's-eye): Best for flat lays, ingredient spreads, and arrangements where height is minimal or irrelevant
- 45-degree angle: The versatile workhorse — shows both top and sides of most bakes
- Eye-level / straight-on: Ideal for layer cakes, stacked cookies, tall loaves — any bake where height is the hero
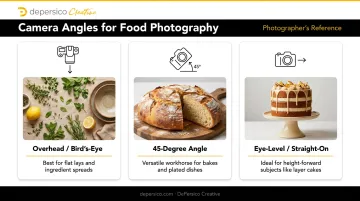
For tall or layered subjects, explore angles from 45 degrees to straight-on to find where the layers and height read best.
Document the Full Process
The finished hero shot is one frame in a much larger story. Every stage of baking produces distinct, shootable content:
- Mixing bowls with batter mid-fold
- Shaped dough lined up on a sheet pan
- The proofed vs. unproofed dough comparison
- The oven door opening on golden bakes
This library of process content supports social posts, recipe blogs, and behind-the-scenes storytelling without requiring an additional shoot day.
Shoot in Burst Mode for Motion
Any motion — hands kneading, a piping bag swirling buttercream, a knife slicing warm bread — benefits from burst mode. Canon recommends continuous shooting for food movement so you can select the sharpest, most visually interesting frame afterward.
Varying your angles throughout a session keeps the final series feeling dynamic — not just the same shot repeated at different zoom levels.
When Great Photography Becomes a Brand Asset
DIY photography is a practical starting point for social content and early-stage brands. However, bakery brands competing at a retail or national level need imagery that is not only beautiful but also consistent, on-brand, and production-ready for packaging, print, and digital applications simultaneously.
An Ipsos poll of 2,002 U.S. adults found that 72% say product package design often influences their purchase decisions — a figure that reflects how much visual presentation shapes consumer behavior before a product is even tasted.
Achieving that consistency requires more than a good camera — it takes strategic creative direction. Agencies like DePersico Creative, which has spent over 45 years working with brands including Kellogg's, Campbell's, and J. Skinner Baking, treat photography as part of a cohesive brand system rather than an isolated task.
That integrated approach means every image is built to perform across contexts:
- Retail packaging — where shelf appeal drives purchase decisions in seconds
- Digital and social — where consistent visuals build brand recognition over time
- Print and trade materials — where production-ready quality is non-negotiable
Frequently Asked Questions
What camera settings work best for baking photography?
A wider aperture (f/1.8–f/4) creates background blur while keeping the bake sharp; keep ISO as low as your light allows to minimize grain. For motion shots like steam or falling flour, use a shutter speed of 1/250 or faster.
How do I capture steam rising from fresh-baked bread?
Steam only shows against a dark background with side or backlighting. Pre-focus before the bake exits the oven, then fire a burst immediately since steam fades within seconds. Use a fast shutter speed (1/250 or higher) and shoot the instant the loaf hits the surface.
Should I use natural light or artificial light for baked goods photography?
Natural window light is the first choice for its warmth and softness. Avoid direct on-camera flash, which flattens texture and creates harsh shadows. LED panels or softbox lights are a reliable artificial alternative when positioned to mimic side-window lighting.
What props work best for bakery food photography?
Warm, rustic props — wooden cutting boards, marble or slate surfaces, linen tea towels, wire cooling racks, and ceramic mixing bowls — support the bake without competing with it. Keep the palette neutral and warm, and avoid bold patterns or colors that pull focus.
How do I make baked goods look fresh and appetizing on camera?
Shoot immediately after baking before steam and glaze fade, use warm-toned lighting rather than cool or blue-tinted light, and add a freshness cue like a mid-pour glaze drizzle or visible steam against a dark background.
When should a bakery brand hire a professional food photographer?
DIY photography works well for social content and early-stage brand building. When imagery is needed for retail packaging, national marketing campaigns, or a brand relaunch, professional food photography ensures images meet print production standards and present a consistent, print-ready brand presence.