Introduction
A shopper decides whether to reach for your beverage within seconds — and the photo on the can, bottle, or retailer page is doing the selling before a single sip. Visual processing drives that decision. Research published in 2025 found that packaging visual elements — color, typography, layout — had a statistically significant direct effect on purchase intention among beverage consumers (estimate = 0.229, p = 0.004).
Yet most beverage brands invest heavily in formulating their product and treat photography as an afterthought. The result: imagery that looks fine in isolation but fails to create cravings or inspire someone to pick the product off a shelf.
This guide covers what actually moves the needle — strategic planning, lighting choices, styling principles, ice and condensation management, and when professional photography becomes a commercial necessity.
Key Takeaways:
- Strong drink photography is a commercial asset, not a decorative one — it must work across retail, e-commerce, and social simultaneously
- At least 90% of the work happens before the pour — lighting, glassware, and composition decisions drive the result
- Backlighting is the most reliable technique for translucent drinks; side lighting works better for opaque or layered pours
- Ice quality, condensation timing, and reflection management are the technical details that separate amateur from professional results
- When photography appears on retail packaging or paid advertising, DIY imagery actively costs sales — 45% of shoppers have abandoned a purchase because product images were low quality or missing
Why Drink Photography Is a Strategic Brand Asset
Beverage photography operates across multiple commercial contexts simultaneously: retail shelf, e-commerce listings, social media feeds, menus, and trade show materials. Imagery that isn't intentionally designed to sell tends to underperform across all of them — not because it looks bad, but because it was never built to persuade.
The distinction worth drawing is between pretty and persuasive. A pretty photo might win appreciation. A persuasive one triggers a physical response — the viewer feels thirsty.
How Visual Cues Create Appetite Appeal
Peer-reviewed research confirms the mechanism. Studies show that people see a drink's color before smelling or tasting it, and that color creates a strong expectation of flavor. A 2024 experiment found that suppressing visual color cues reduced juice flavor liking, meaning the visual experience of a drink directly shapes how consumers expect it to taste before they open it.
Visible carbonation works the same way. Bubbles and foam in beverage images communicate quality and freshness as product cues, not just aesthetics.
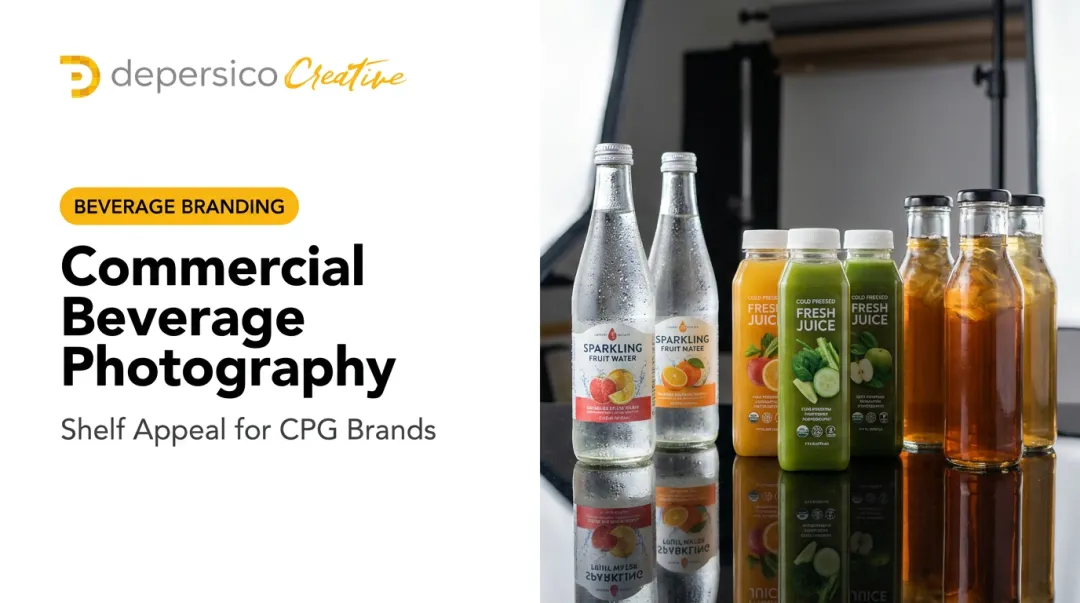
When a sparkling water photo shows vivid bubbles catching backlight and a perfectly placed citrus garnish, the viewer's brain is already processing flavor. That's appetite appeal at work — and it's the difference between a photo that sells and one that simply informs.
Brand Positioning Shapes Every Creative Decision
Photography decisions must align with where the brand sits in the market. A premium craft soda requires a different visual language than a family-friendly juice drink. DePersico Creative's positioning framework identifies four image tiers — modern/artisan, homestyle, gourmet/restaurant-quality, and better-for-you/clean — and each maps to specific photographic choices:
- Gourmet/restaurant-quality: elegant staging, dramatic lighting, high fill lines, minimal props
- Homestyle: warmer surfaces, softer light, casual prop arrangement
- Better-for-you/clean: minimal styling, bright natural light, ingredient-forward framing
- Modern/artisan: craft materials, textured surfaces, bold contrast
Every shoot should be guided by a clear creative brief tied to brand identity before a single glass is filled.
Plan Before You Pour: The Pre-Shoot Strategy
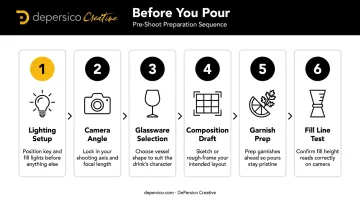
The real work in drink photography happens before the camera comes out. Once ice, foam, or condensation appear, the clock is running. Decisions made under pressure — wrong glass, misplaced light, garnish that doesn't fit the frame — show up in the final image.
The Pre-Shoot Checklist
Work through these decisions before preparing the hero drink:
- Lighting setup — position and diffuse the light source before anything else
- Camera angle — locked in before the glass is filled
- Glassware selection — chosen and cleaned, positioned in frame
- Composition draft — props placed and checked for balance and clutter
- Garnish prep — multiple variations ready, tested dry in frame
- Fill line test — determine the ideal fill height using water before the real pour
Choosing the Right Camera Angle
The angle decision shapes every other styling choice. Garnish heights, prop placement, and how the glass reads in frame all shift depending on where the camera sits.
| Angle | Best For | Notes |
|---|---|---|
| 45-degree | Most drink categories | Natural table perspective; works with most glass shapes |
| Eye-level | Showcasing glassware shape | Adds elegance; works well for tall or stemmed glasses |
| Just below eye-level | Drama and depth | Useful with stemmed glasses; makes drinks feel substantial |
| Top-down flat lay | Ingredient storytelling | Best when the glass shape matters less than the surrounding context |
The Stand-In Pour
Before filling the hero glass, use a stand-in drink — plain water or water with food coloring — to finalize lighting and composition. This preserves the hero pour for its freshest moment. Condensation and carbonation both degrade within minutes. Locking in every technical decision first means the hero pour goes straight to camera — no second chances needed.
Mastering Light for Beverage Photography
Lighting is the single most important factor in professional drink photography — and it must be established before any styling decisions are made. Everything else (props, garnish, composition) is built around the light, not the other way around.
Light Source Options
- Single bright window with diffusion (sheer curtain or scrim): produces soft, directional natural light; the most accessible starting point
- Continuous LED lights: provide consistent, controllable output; allow real-time adjustment
- Strobe/flash units: maximum control and power; standard for commercial studio work
One light source is often sufficient. Adding a second creates complexity that can introduce unwanted reflections if not managed carefully.
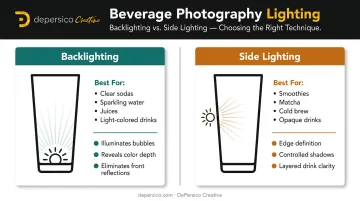
Backlight vs. Side Light
Backlighting (light source positioned directly behind the drink) is the go-to technique for clear and translucent beverages. It illuminates bubbles from within, reveals color depth, creates a glowing quality, and eliminates most front reflections. For sodas, sparkling waters, juices, and light-colored drinks, backlight produces the most compelling result.
Side lighting works better for opaque or layered drinks: smoothies, matcha, cold brew. Positioning the light slightly behind and to the side creates edge definition on the glass without generating harsh front reflections.
A practical addition to either setup:
- Foam boards placed opposite the light source act as affordable fill reflectors, softening shadows and balancing exposure without a second light
Hard vs. Soft Light
- Soft light (softbox, umbrella, or diffuser): even, balanced illumination; gentle shadows; safer for highly reflective glassware
- Hard light (bare bulb or direct sun): strong contrast, dramatic shadows, bold highlights; appropriate for specific brand aesthetics but requires highlight preservation in-camera and shadow recovery in post
Brown and amber drinks — dark teas, cola, certain functional beverages — tend to look muddy under front or side lighting. Backlight transforms them: what reads as flat dark brown becomes luminous gold or bronze.
Styling, Composition, and Props That Sell
Every element in the frame earns its place — communicating flavor, feeling, or brand story. If it's not doing that work, pull it out.
Start with more props than you think you need, then remove aggressively. Visual clutter competes with the product for the viewer's attention — and in a photograph, that competition is one the product usually loses.
Garnishes and Glassware
Garnishes are the fastest way to communicate flavor and freshness. A well-placed citrus peel or fresh herb tells the viewer what the drink tastes like before they read a word. Prep multiple garnish variations before the hero pour — one with an extra element, one rotated at a different angle — and test them dry in the frame first.
Glassware is a brand decision, not just a stylistic one. The shape, height, texture, and clarity of the glass communicate tier and category:
- Tall, clear, minimal-seam glass: premium, clean positioning
- Textured or faceted glass: craft, artisanal quality
- Short, wide glass: casual, everyday use
- Stemmed glass: elegant, occasion-driven
Use sticky tac under glasses to keep them perfectly upright on uneven surfaces — it's invisible on camera and easy to remove.
Composition Principles
Four techniques that consistently produce stronger beverage images:
- Rule of thirds: place the primary drink at an intersection point, not dead center
- Rule of odds: use 1, 3, or 5 elements rather than even numbers
- Overlap: allow props and glasses to break each other's edges, adding depth and naturalism
- Leading lines: bar spoons, citrus slices, or label edges that draw the eye toward the drink
Color and Contrast Strategy
The drink's color should contrast with the background and props — not blend into them. If the hero product is a bright orange citrus drink, don't surround it with orange props. Use complementary or contrasting colors to make the drink pop visually.
One common mistake is matching garnish color to the drink color — it flattens the image and kills visual separation. Two contrast principles worth building into every shot:
- Avoid same-color garnishes: a lime garnish on a lime soda disappears into the drink
- Go darker or complementary: a charred citrus wheel or dark herb creates the contrast that draws the eye

Ice, Condensation, and Reflections: The Details That Make or Break the Shot
Ice Quality and Quantity
The difference between clear ice and standard freezer ice is visible in a photograph. Clear ice catches light cleanly, reads as quality, and doesn't distract the eye. Opaque white ice pulls attention and can read as half-melted or cheap.
Ice options by shoot type:
- Clear bagged ice: the minimum investment for a clean result
- Crystal-clear block ice: for premium hero shots where individual cubes will be visible
- High-quality fake ice: best for extended commercial shoots where consistency matters more than the fresh-poured look
One practical rule: fill the glass to the brim with ice so liquid fills the space between cubes rather than floating ice at the top. A glass that looks full in person reads as half-empty in a photograph.
Condensation and the Window of Fog
The brief period after a cold drink is poured — when condensation creates a frosted layer on the glass exterior — is the most valuable moment in beverage photography. This "window of fog" naturally eliminates reflections and gives the glass a beautiful, authentic freshly-poured quality.
Plan the entire shoot around capturing this window — lighting locked, composition confirmed, camera ready before the pour happens.
For extended shoots where natural condensation isn't repeatable, a water-and-glycerin spray extends the frosted look artificially, giving the glass a controlled condensation effect without the time pressure.
Managing Reflections
Reflections in glass are the most technically challenging aspect of drink photography. These tools give you the most control:
- Lighting position: backlighting or just-behind-side-lighting reduces front reflections by keeping the light source out of the glass's natural reflection zone
- Polarizing lens filter: actively reduces glare on glass and bottles by blocking reflected light from non-metallic surfaces
- Post-production: Photoshop Clone Stamp and Spot Healing Brush for removing remaining reflections — particularly those created by other frame elements that can't be avoided in-camera
Professional beverage photography almost always includes a Photoshop compositing pass. A fully clean image captured in-camera alone is the exception, not the standard.
A high fill line also works in your favor here — it minimizes the unfrosted glass above the liquid, which is where harsh reflections tend to cluster most.
When Professional Beverage Photography Pays for Itself
DIY and smartphone photography can produce strong results for social content and early-stage brand building. But there are specific contexts where amateur imagery stops being a cost-saving choice and starts actively costing sales.
The threshold is commercial distribution. When photos will appear on:
- Retail packaging
- National distribution materials
- E-commerce product listings
- Paid advertising
...the imagery is competing against products with professional photography budgets. Amateur shots at these touchpoints signal low brand quality before a shopper reads a single claim.
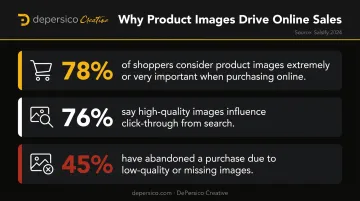
The numbers support the concern. Salsify's 2024 consumer research found that 78% of shoppers consider product images extremely or very important when purchasing online, 76% say high-quality images influence whether they click through from search, and 45% have abandoned a purchase because images were low quality or missing.
Retail platforms formalize this requirement. Walmart Marketplace requires images that are in focus and professionally lit, with a seamless white main-image background. Amazon specifies a pure white background, 500–10,000 pixels on the longest side, and restrictions on text overlays and watermarks.
The Integrated Approach
What separates effective commercial photography from a one-day shoot is how it connects to the brand's existing visual system. At DePersico Creative, the same team that develops packaging design handles photography, so props, surfaces, lighting style, and composition choices are built around a brand's established guidelines rather than decided from scratch on shoot day.
For beverage brands entering retail or scaling distribution, treating photography as a separate line item creates risk. The disconnect between package and photo assets often surfaces only after a listing goes live, when fixing it costs more than getting it right the first time.
Frequently Asked Questions
What makes drink photography different from regular food photography?
Drinks present unique technical challenges that static food subjects don't: reflections in curved glassware, melting ice with a narrow shooting window, condensation that appears and disappears quickly, and the near-universal need for Photoshop compositing to manage multiple exposures. Each of these variables requires a separate technical solution — which is why beverage shoots are far more complex than most people expect.
Do I need expensive equipment to photograph my beverage products professionally?
A single bright window with diffusion and a foam board reflector can produce strong results on a budget. The true baseline requirements are camera control (manual settings), a longer focal length lens (85mm or longer), and post-production editing software — not the price of the camera body.
How do I photograph carbonated drinks without losing the bubbles?
Shoot immediately after pouring — freshly poured drinks have the most active carbonation. Slightly agitating the carbonation source before pouring boosts bubble activity. Use a fast shutter speed (1/500 sec or higher) to freeze the effervescence rather than letting motion blur soften it into the background.
What camera settings are best for beverage photography?
Use a mid-range aperture of f/5.6 to f/8 for adequate depth of field across the full drink. An 85mm or longer lens on a full-frame body reduces perspective distortion on tall glasses. For pour or action shots, 1/500 sec or faster keeps motion sharp.
Should I use real ice or fake ice for drink photography?
Real clear ice is preferred for fresh, authentic shots — especially when the condensation window is part of the visual strategy. High-quality fake ice is appropriate for extended commercial shoots where consistency and repeatability matter more than the freshly-poured look.
How does drink photography directly help a beverage brand sell more?
Visual cues — color, carbonation, condensation, garnish — create flavor expectations before a consumer reads a word. Color alone shapes taste expectations and drives purchase intent before a single word is read. Photography that communicates freshness through lighting and styling wins the shelf moment; imagery that doesn't hands it to the competitor beside it.