Most beverage brands still treat drink photography as an afterthought. They lean on flat lighting, a phone camera, or generic stock imagery that fails to capture freshness, flavor, or the premium feel a product deserves. The result? A drink that tastes incredible gets scrolled past because the photo looked flat, dull, or forgettable.
This guide breaks down what makes beverage photography uniquely difficult, why professional-grade imagery moves the needle on sales, the techniques separating amateur shots from commercial work, and how to know when your brand has outgrown DIY.
Key Takeaways
- Beverage photography is harder than food photography due to transparency, reflections, and melting ice or collapsing foam
- 78% of shoppers say product images are extremely or very important to their purchase decisions
- DIY gear suits small-scale content, but retail packaging and national campaigns demand studio-grade consistency
- Agencies pairing photography with brand strategy make images and packaging work together as one system
What Makes Commercial Beverage Photography So Uniquely Challenging
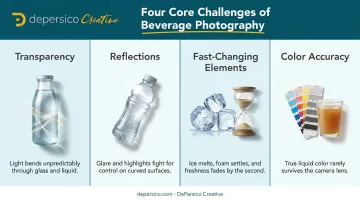
Solid food reflects light off its surface. Liquid doesn't work that way. Transparent and translucent drinks, think juice, soda, sparkling water, need light to pass through them, not just bounce off. That single difference changes the entire lighting approach before a photographer even picks up a camera.
Reflections Everywhere You Don't Want Them
Curved glass and metallic cans reflect everything in the room. A stray light stand, a white ceiling, even the photographer's shirt can show up as an unwanted glare on a bottle. Commercial shoots typically require multiple controlled lights and reflectors, not a single window with soft light, because one light source simply can't manage a curved, reflective surface.
A Shooting Window Measured in Minutes
Beverage photography runs on a countdown clock:
- Ice starts melting the moment it hits the glass
- Foam collapses within minutes on coffee drinks or kombucha
- Condensation forms fast once a chilled glass or can hits studio lights, often within just a few minutes
- Garnishes wilt or discolor under continuous lighting
This is why professional shoots plan every element, camera angle, lighting position, garnish placement, before the liquid ever gets poured. There's no time to improvise once the drink hits the glass.
Color Accuracy Isn't Optional
Unlike food styling, which allows some creative license, beverage photography has to render color with brand-accurate fidelity. Packaging, labels, and marketing all depend on the liquid looking true to the real product. A juice that photographs too orange or a soda that reads too dark creates a mismatch the moment the product arrives.
Different vessels add their own wrinkles too. Curved glass distorts labels, metallic cans throw glare, and cartons need flat, even lighting to keep text legible. Bottles, cans, and cartons each require category-specific technique. There's no one-size-fits-all setup.
Why Professional Beverage Photography Directly Impacts Sales
On a crowded shelf or an endless e-commerce grid, the photo is the sales pitch. Shoppers decide whether a drink looks appetizing and trustworthy within seconds, long before they read a single ingredient.
The data backs this up. 78% of shoppers rated product images as "extremely" or "very" important when deciding what to buy online, according to a 2024 Salsify survey of 2,700 U.S. and U.K. shoppers. That's not a beverage-specific number, but it reflects how e-commerce shopping behavior works across categories, including drinks.
The Cost of a Mismatch
Here's the risk nobody talks about enough: when packaging or delivery-app photos look noticeably better, or different, than the real product, trust takes a hit. Consumers notice.
54% of consumers have returned a product because of inaccurate pre-purchase information, according to Akeneo's 2023 global B2C survey. That statistic covers product information broadly, not photography alone, but a beverage that looks nothing like its photo falls squarely into that category.
Professional photography solves this by building a consistent visual asset library, one set of images usable across packaging, e-commerce, social media, and in-store displays. No patchwork of mismatched photos taken at different times with different equipment.
Consider Coca-Cola's "Share a Coke" campaign, which paired personalized packaging with a coordinated visual and marketing push. The company reported meaningful revenue and volume growth during that period.
The campaign combined media, promotion, and design together rather than treating them as separate efforts. That combination, not photography alone, drove the results, but it demonstrates what happens when packaging and imagery move as one unified strategy.
That's the philosophy behind DePersico Creative's approach: packaging and photography work as strategic tools to create cravings and inspire trial. Having supported national brands like Kellogg's and Campbell's, the agency has seen firsthand how disconnected visuals undercut otherwise strong products.
The Techniques That Separate Amateur Shots From Commercial-Grade Beverage Photography
Lighting Strategy
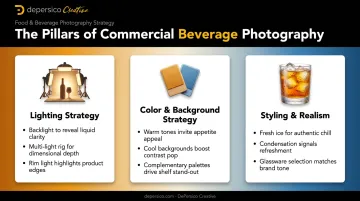
Backlighting is the technique that makes transparent and translucent drinks glow. Placing light behind or beneath the liquid, rather than in front of it, creates that appetizing, luminous look brands want for hero shots of sparkling water, cold brew coffee, or juice.
Commercial studios also rely on multi-light setups, typically a key light, fill light, and rim light working together, instead of one window or single strobe. Why? Because a single light source can't deliver consistent, repeatable results across dozens of SKUs and future reshoots. Multi-light setups can be dialed in once and replicated precisely months later.
Color & Background Strategy
Warm drinks photograph better against cool surfaces, and cool drinks pop against warm backgrounds. This contrast principle isn't just aesthetic; it makes the product visually separate from its surroundings.
Background and prop choices in commercial work also need to match the packaging's design language:
- A premium cold brew needs a background that echoes its label's tone
- A bright, fruity soda needs colors that reinforce, not compete with, its can design
- Props should feel like an extension of the brand, not random styling
Styling, Glassware & Realism
Glass and vessel choice signals positioning. A premium sparkling water photographed in an etched glass tumbler reads differently than the same drink poured into a plastic cup. Professional stylists match vessel choice to where the brand sits in the market, everyday versus premium.
Vessel choice sets the visual tone, but realism carries it through the entire shoot. Controlling ice, foam, and condensation for a believable "fresh-poured" look takes real skill, often requiring multiple pours, glycerin-water sprays for lasting droplets, and careful timing within the product's usable window.
Common Beverage Photography Mistakes That Quietly Hurt Sales
Some mistakes don't look like mistakes. They just cost sales.
- Using generic stock photography instead of the actual product creates a disconnect the moment a customer sees the real item in person
- Over-editing or oversaturating color until the liquid no longer matches its real-world appearance, risking distrust and potential label-accuracy issues
- Photographing the beverage in isolation from its packaging and label design, producing images that feel disconnected from how the product looks on the shelf
Each of these seems minor in isolation. Together, they add up to a brand that looks inconsistent across every touchpoint: packaging, website, and social feed, which quietly erodes the trust that gets a shopper to try something new.
DIY vs. Professional Photography: When Does Your Brand Need to Upgrade
DIY setups, a smartphone, a single light, basic props, work fine for small-scale content. Think social posts, menu updates, or early-stage concept testing where speed matters more than polish.
Professional studio photography becomes necessary once a brand hits certain milestones:
- Retail packaging that needs to perform consistently across every store and shelf placement
- Multi-SKU product lines where visual consistency across every image is non-negotiable
- National campaigns where the same photo will run across packaging, ads, and digital simultaneously
Here's the tradeoff in plain terms:
| Factor | DIY Setup | Professional Studio |
|---|---|---|
| Cost | Low | Higher upfront investment |
| Speed | Fast turnaround | Requires planning and scheduling |
| Consistency | Limited across SKUs | Repeatable, brand-accurate results |
| Control | Basic lighting/reflections | Full control over light, styling, color |
| Best for | Social content, testing | Packaging, retail, national campaigns |
A studio with a dedicated test kitchen and lighting rig delivers results that hold up across a full product catalog. DIY simply wasn't built for that scale.
Inside a Professional Studio: How DePersico Creative Approaches Beverage Photography
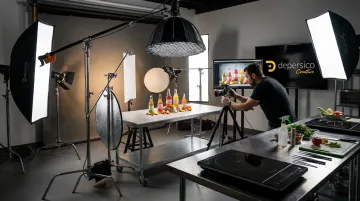
DePersico Creative runs a fully equipped, in-house test kitchen and studio purpose-built for controlled, repeatable food and beverage photography. Multiple SKUs, one consistent visual system.
Every project starts with their SWIFI assessment (Strengths, Weaknesses, Ideas For Improvement), a visual perception process that evaluates existing product imagery and pinpoints specific opportunities to make a beverage more compelling on shelf. The process identifies exactly where a product's current photography is losing shoppers on shelf, based on visual evidence rather than opinion.
What makes the model distinct is that it's entirely in-house:
- Brand analysis
- Creative linguistics
- Photography
- Package design
One team handles all of it, working directly with the company's President instead of passing projects between account managers. That structure keeps photography and packaging strategy pointed in the same direction instead of drifting apart, which is exactly the fragmentation that causes the "photo doesn't match the shelf" problem in the first place.
That structure is backed by decades of results. DePersico brings over 45 years of experience as a three-generation, family-owned business, having supported national food and beverage brands including Kellogg's and Campbell's. That track record gives brands a concrete reason to trust who shapes their visual identity.
Frequently Asked Questions
What is commercial beverage photography and how is it different from regular food photography?
Beverage photography deals with transparency, reflections, and fast-changing elements like ice and foam. It requires different lighting (often backlighting) and much tighter timing than solid food photography.
How much does professional beverage photography typically cost?
Costs vary widely based on scope. A single hero shot costs far less than a multi-SKU packaging campaign. Many studios, including DePersico Creative, use project-based pricing to fit different brand budgets.
What equipment do professional photographers use for beverage shoots?
Studio lighting rigs, macro lenses for label and droplet detail, polarizing filters to cut glare, and controlled backdrops all work together to achieve consistent, brand-accurate results.
How long does a professional beverage photoshoot take?
Timelines range from a few hours for a single product to multiple days for a full product line. Most of the actual work happens in planning and setup before the drink is ever poured.
Can AI-generated images replace professional beverage photography for packaging and branding?
AI tools can work for quick social or menu content, but retail packaging and national campaigns still rely on professional photography for accuracy and brand consistency.
How do professionals keep beverages looking fresh throughout a photoshoot?
Techniques include pre-chilling glassware, using glycerin-water sprays for longer-lasting condensation, and shooting within the brief window before ice melts or foam collapses.