Introduction
A consumer standing in the beverage aisle makes a purchase decision in roughly 13 seconds, often before reading a single word on the label. What triggers that decision? In most cases, it's a visual cue — and water-based photography is one of the most reliable ways to create the right one.
Droplets on a cold can. A splash wrapping around a sparkling water bottle. Mist hovering over a premium glass bottle. These aren't accidental stylistic choices. They're deliberate tools beverage brands use to signal freshness, energy, and desirability at the moment that matters most.
This guide covers the most effective water-based photography techniques for beverage brands: condensation and droplets, dynamic splashes, mist and submersion, and reflective water surfaces. Each section includes practical guidance on lighting, styling, and when to bring in professional support.
Key Takeaways
- A 1:1 glycerin-water mix creates stable, photogenic condensation that holds up through a full shoot
- Flash duration, not shutter speed, freezes splash motion — strobes at 1/5600 sec stop water cleanly
- Backlighting is the starting point for translucent beverages; it makes liquids glow and droplets sparkle
- Submersion shots need rear-lit diffusion panels and independently shaped light for transparent packaging
- Consistent photography and packaging design together protect brand color accuracy and shelf recognition
Why Water Works So Well in Beverage Product Photography
Water communicates before comprehension kicks in. A consumer doesn't analyze a condensation-covered bottle and think "this must be cold" — they feel it. The craving arrives before any conscious decision is made.
Research from NIQ confirms that 64% of consumers try a new product because the packaging catches their eye, and optimized package designs produce an average 5.5% lift in forecasted revenue. For beverage brands, where the product sits hidden inside opaque packaging, the visuals surrounding it do the selling.
Water imagery works because the eyes and body respond to it together. What shoppers see triggers what they expect to feel. Cold, wet, clear, and moving water signals:
- Freshness — the product hasn't been sitting on a shelf for months
- Purity — clean water reads as clean ingredients
- Hydration — the body responds physically to thirst triggers before a decision is made
- Energy — moving water (splashes, bubbles) communicates action and vitality
Water Adapts to Any Brand Personality
What makes water especially useful is its range. The same element can communicate entirely different brand personalities depending on execution:
- Still droplets on a dark background → premium, sophisticated
- Mid-air splash in bright light → bold, energetic, active
- Mist around a minimalist bottle → wellness, botanical, calm
- Reflective flat surface → clean, modern, lifestyle-forward
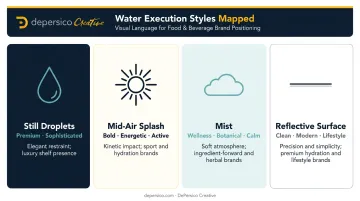
This versatility makes water-based photography applicable across still water, sparkling beverages, juices, energy drinks, functional drinks, and ready-to-drink (RTD) teas — any product category where freshness or vitality is part of the story.
Water Droplets and Condensation: The "Just-Chilled" Effect
Condensation is the most widely used water technique in beverage photography, and for good reason. A bottle covered in droplets signals one thing instantly: this drink is cold and ready. That signal is visceral — it triggers thirst before the viewer consciously registers the product.
Real Condensation vs. Artificial Misting
There are two ways to get droplets on a bottle or can:
- Real condensation — chill the product and let humidity do the work. The result looks natural because it is natural. The problem: it's unpredictable, changes rapidly, and can drip before you nail the shot.
- Artificial misting — apply water droplets manually using a fine-mist spray bottle. Faster, more controllable, but the droplets evaporate quickly under studio lighting.
The Glycerin Solution
The professional workaround is a 1:1 vegetable glycerin-to-water mixture, applied with a fine-mist spray bottle. This practitioner formula produces droplets that:
- Stick to the surface rather than immediately sliding
- Create rounder, more photogenic beads than plain water
- Hold their shape under studio lights for much longer
For shoots where time and consistency matter — which is most commercial shoots — glycerin is the industry standard. Plain water produces a frosted, dewy look; glycerin-water creates the larger, clearly defined droplets that photograph best.
Droplet Placement Strategy
Where you put droplets matters as much as how you make them. A few practical rules:
- Cluster droplets toward the top of the bottle and let them thin out toward the base — this mirrors how real condensation forms and reads as natural
- Keep the label face clean — droplets that obscure brand name or key claims undo the purpose of the shot
- Spray only where cold liquid would meet the container — droplets across the entire surface can look artificial if they're placed where physics wouldn't put them
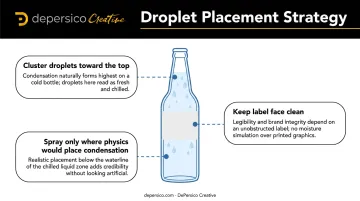
This technique works best for still water, sparkling water, sports drinks, canned sodas, and RTD iced coffees. If your product's core promise isn't cold refreshment, heavy condensation can feel incongruent with the brand — a cleaner, drier shoot may serve the story better.
Dynamic Splash Photography: Injecting Energy into Your Beverage Brand
For brands built on energy, bold flavor, or refreshment, a static bottle on a white background rarely tells the full story. Splash photography introduces motion into the frame — giving viewers an immediate sense of what the product feels like, not just what it looks like.
Two Creative Approaches
1. Wrap-around product splashes Water is poured or thrown at the bottle or can to create a dramatic splash that frames the product. This keeps the product centered and visible while surrounding it with kinetic energy. Common for energy drinks and sports beverages.
2. Ingredient impact splashes Fruit, ice, or key ingredients are dropped into liquid to create an impact splash that tells a flavor story. Dropping sliced citrus into a clear glass of juice, for example, communicates freshness and real ingredients in a single frame.
The Technical Reality: Flash Duration, Not Just Shutter Speed
A fast shutter speed alone isn't what freezes water. When ambient light is suppressed in the studio, the strobe's flash duration becomes the effective exposure time. Broncolor's commercial beverage setup uses a flash duration of 1/5600 second to stop water motion cleanly — a specification worth asking any photographer about before booking a splash session.
High Speed Sync flash extends these options further on compatible cameras, particularly useful in brighter ambient conditions.
Keeping the Label Visible
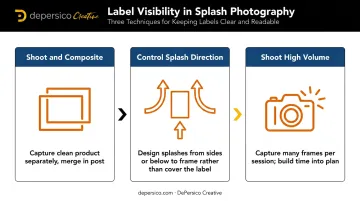
Water covering the label is a real problem in splash work. Three techniques keep branding visible:
- Shoot and composite separately — capture a clean product image, then merge it with the best splash frame in post. This is standard commercial practice for polished results.
- Control splash direction — design splashes that come from the sides or below, framing the product rather than washing over the label face.
- Shoot high volume — the perfect frozen moment is unpredictable, so capturing a large number of frames per session is part of the process. Build that time into your session plan.
Water Mist, Fog, and Submersion: Creating Mood and Premium Appeal
Not every brand needs explosive energy. For premium still water, botanical beverages, wellness drinks, and functional products, the right mood is quiet, atmospheric, and considered. Mist and submersion are the tools that get you there.
Mist and Fog Effects
A fine mist applied around the product — or a fog machine creating atmospheric haze — communicates chilled temperature without the drama of a splash. The visual effect is soft and enveloping rather than energetic.
This approach works particularly well for:
- Premium still water brands
- Botanical and herbal beverages
- Wellness and functional drinks
- Any brand positioning itself as sophisticated or spa-adjacent
The key to mist photography is backlighting. As PetaPixel's beverage photography guidance documents, placing a light source opposite the camera — with the product between them — makes clear liquids glow and gives mist its characteristic luminous quality.
Submersion Photography
Placing a bottle or can inside a clear water tank creates an "underwater" aesthetic that communicates immersion, purity, and visual depth. A clear-sided acrylic container works well as an accessible studio solution.
Lighting determines whether the shot works. The most effective submersion setups use multiple sources — rear illumination through the tank, a shaped main light for the bottle itself, and a dedicated source for the cap and label above the waterline. Single frontal lighting flattens everything; layered rear illumination is what gives transparent packaging its depth, glow, and visual dimension.
Adding Bubbles for Carbonated Brands
For sparkling water or carbonated beverage brands, introducing rising bubbles into a submersion shot adds motion and directly mirrors the product's carbonation visually. The reinforcement is immediate — you can see what the product does, without relying on label copy to explain it.
Reflections, Ripples, and Flat Water Surfaces
Reflection photography positions a beverage on or near a mirror-like water surface to create a doubled visual — the product and its reflection below it. The effect adds elegance and depth without complexity, making it a natural fit for brands that lead with clean, refined visuals or want to signal quality through restraint.
How to Create This Effect in a Studio
Three accessible options for creating a reflective surface:
- A shallow tray of still water — natural, affordable, slightly unpredictable
- A reflective acrylic sheet — consistent, controllable, no liquid handling required
- A wet marble or slate surface — adds texture and lifestyle context alongside the reflection
Vflat World's guide to acrylic water trays documents this as a practical, accessible technique for product photographers working outside a full commercial studio setup.
Controlled Ripples
A perfectly still reflection reads as formal and composed. Adding gentle surface movement — via a straw breath, a soft tap on the tray, or a careful pour — creates a rippled texture that feels summery and organic. The motion doesn't need to be dramatic; subtle ripples are enough to change the mood from editorial to lifestyle.
Background Color and Mood
Surface motion sets the energy of the shot — but background color sets its personality. The tone beneath a reflective surface shapes viewer associations before they read a single word on the label:
| Background Color | Visual Impression |
|---|---|
| Deep navy or black | Premium, night-time, sophisticated |
| White or pale blue | Clean, refreshing, pure |
| Warm tones (terracotta, sand) | Lifestyle, approachable, summer-ready |
These color associations translate directly from packaging psychology into set design — making them a reliable starting point when briefing a photographer or building a mood board.
Lighting, Styling, and Camera Essentials for Water Beverage Shots
Lighting Principles
Backlighting and side lighting consistently outperform direct front flash for water photography. Front flash flattens the three-dimensional quality of droplets and eliminates the translucency that makes liquids look alive. The core principles:
- Backlight — place a light source behind and opposite the camera; the product sits between camera and light. This makes clear liquids glow and droplets sparkle.
- Side light — illuminates the curvature of bottles and cans while creating depth and shadow that gives the image dimension.
- Strobe or off-camera flash — essential for splash photography; the short flash duration does the freezing work, not the shutter speed alone.
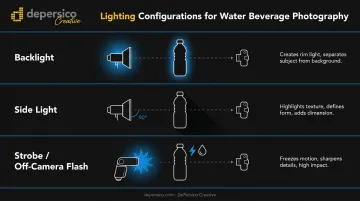
A practical starting configuration for still shots: one backlight through a diffusion panel behind the product, plus a secondary side fill card or light to open up shadows on the label face.
Styling and Props
Props support the product's story — they shouldn't compete with it. Common choices:
- Citrus slices, herbs, ice, botanicals — communicate flavor and freshness without written claims
- Wet slate or concrete — reads as urban, masculine, and performance-oriented
- White marble — reads as premium, clean, and health-conscious
- Natural wood — reads as artisanal, organic, and approachable
The surface choice shapes the target demographic's response as much as the product itself does.
Post-Production
Standard post-production steps for water-based beverage shots include:
- Compositing clean product shots with separate splash or mist captures
- Enhancing droplet clarity and brightness
- Removing unwanted splash distractions or tank reflections
- Color grading to align photography with packaging brand colors
Color grading deserves particular attention. X-Rite's CPG packaging research documents that color-managed workflows can deliver up to 30% fewer production claims — because color accuracy in photography directly affects how consistently a product looks across packaging, digital listings, and marketing assets.
For beverage brands managing photography and packaging together, this is where studio integration matters. When both disciplines are handled under one roof, photography colors can be calibrated against the same brand standards that govern the packaging — the kind of consistency DePersico Creative builds into every food and beverage project from their West Chester, PA studio.
Frequently Asked Questions
What camera settings work best for water splash beverage photography?
Flash duration is more important than shutter speed when freezing water in a controlled studio. Suppressing ambient light and relying on a strobe at approximately 1/5000 to 1/6000 second flash duration stops motion cleanly. High Speed Sync flash extends this capability on compatible camera systems for brighter conditions.
How do I make condensation look realistic on a beverage bottle?
Apply a 1:1 vegetable glycerin-to-water mixture using a fine-mist spray bottle. Cluster droplets near the top of the container and keep the label face clear so branding stays readable. Glycerin holds the droplets far longer than plain water under studio lighting.
Can effective water product photography be done without a professional studio?
Basic techniques — shallow water trays, mist spray, natural window backlighting — are achievable in a DIY setup and can produce usable results for social content. Consistent splash and submersion photography for commercial use requires controlled studio lighting and compositing capability.
What lighting setup works best for beverage photography featuring water?
Start with backlighting: position the light source behind the product, opposite the camera. This makes translucent liquids glow and gives droplets their sparkle. Add a side light or reflective card to shape shadows. For splash shots, use off-camera strobe rather than ambient light — the flash duration freezes motion, not the shutter.
Which water photography technique is best for sparkling or carbonated beverage brands?
Splash photography and submersion with introduced bubbles are both strong fits. Splashes echo the energy of carbonation visually, while rising bubbles in a submersion shot directly mirror the carbonation story the product tells.
How many shots should a brand plan to capture in a water splash photography session?
Plan for high volume. The exact moment when water freezes perfectly is unpredictable, which means repeated captures and review are built into the process. Budget your session time generously, and expect that the hero image will likely be a composite of the best product frame and the best splash frame rather than a single capture.